Very much thanks to L. and A. Oppenheim at School of IT, Swinburne University, Australia for the work of translating from German to English.
JFE was always quite usable. Without any documentation however, it was commonly found that it was not possible to make use of the inexhaustible possibilities provided by the editor. Now finally a remedy is at hand. However, only the important things which differentiate this editor from others will be described.
| Downloads: | Documentation: | ||||||||||
| JFE V3.95 | 01/06/2010 | (English) | To Jens' Home page | ||||||||
| JFE V3.95 | 01/06/2010 | (German) | To the description in German | ||||||||
| JFE V3.90 | 12/29/2006 | (English) | JFE documentation | (HTML) | |||||||
| JFE V3.87 | 06/16/2005 | (German) | JFE documentation | (PDF) | |||||||
| JFE V3.87 | 06/16/2005 | (English) | |||||||||
| JFE V3.84 | 02/25/2004 | (German) | JFE V3.94 Configuration Guide (in Portuguese) | ||||||||
| JFE V3.84 | 02/25/2004 | (English) | Configurando o Jens File Editor | ||||||||
| JFE V3.79 | 06/25/2002 | (German) | Configurando o Jens File Editor | ||||||||
| JFE V3.53 | 09/18/2000 | (English) | Configurando o Jens File Editor | ||||||||
| JFE V3.53 | 09/18/2000 | (German) | |||||||||
These functions are carried out with the mouse in combination with the ALT key.
Areas that go over a line will be filled up with empty characters and completed with the number of characters required for a whole line. The selected text is therefore always a rectangle. The colour with which desired text is highlighted can be changed by altering the 15th text background colour in the colour menu. Blocks (and also normally selected text) can be inserted at the current cursor position using CTRL-V (as normal) or also into a column.
There are three ways to insert blocks:
maybe so (B=inserted block, T=text)
TTTTTTTT TTTTTTTTTTTT TTTTTTTT BBBBBTT TTTTTTTT BBBBB TTTTTTTT BBBBBTTTTTTTTTT TTTT BBBBB TTTTTTTT BBBBBTT TTTTTTTT TTTTTTTTTTTT Do:
TTTTTTTT TTTTTTTTTTTT TTTTTTTT BBBBBTT BBBBB BBBBB BBBBB BBBBB TTTTTTTT TTTTTTTTTT TTTT TTTTTTTT TT TTTTTTTT TTTTTTTTTTTT Do:
TTTTTTTTTTTTTTTTTTTT TTTTTTTTBBBBB BBBBB BBBBB BBBBB BBBBB TT TTTTTTTTTTTTTTTTTT TTTT TTTTTTTTTT TTTTTTTTTTTTTTTTTTTT
Of course you can define own hotkeys for these operations.
![]()
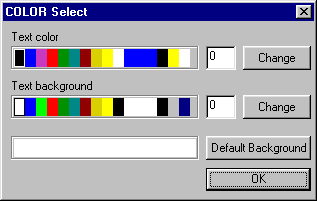
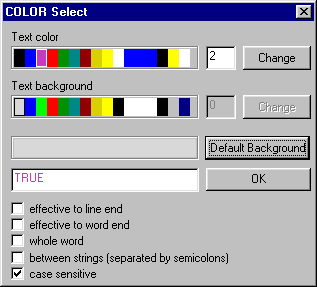
For every character there exists a byte for colour information. Out of this byte, the lower nibble describes the text colour and the upper nibble the text background. The colour number (0..15) contains an index from the table of actual 24bit-RGB colour values. Therefore at any one time there are only 16 different colours able to be selected. The colour settings are under the menu item "Settings-Colour". All colour settings are saved in INI data file or the respective project file. In order to modify a colour, select the appropriate small box with the mouse and click on "Change". Another colour can then be selected from the colour dialog box. The text foreground colour in index 0 (the first small box) is the preset writing colour for non selected text, and when syntax highlighting is not used (preset to black). Comparatively, the preset colour for the text background is in Index 0 of the underlying table for the text background. The text background refers only to those areas which actually contain text. All other areas are set using the "Default background colour". For simplification, when this colour is altered, so is Index 0 of the colour table, i.e. the text background is also altered. Those who wish to have the text with a different background must first set the Default Background and then the text background. The indexes 14 and 15 also have special meanings. The colour index 15 determines how selected areas in the foreground and background will appear. Therefore it is possible that the selection appears different to the default settings in Windows. The colour index 14 has a double function. Firstly it determines the appearance of the line numbers border. Secondly it indicates the text background colour during Block Selection of the empty characters.
![]()
 |
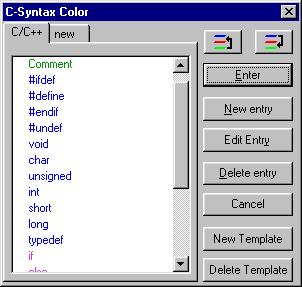 |
For C and C++ the fundamental syntax highlighting colours are already pre-defined. You can, however, still create additional different colour templates for other programming languages. To do this, open the menu: "Settings - Syntax colours" and start a new Template. The requested name is arbitrary and serves only to differentiate adjustments to the template within the INI file. The new template is initially empty and must first be filled with the key words to be highlighted. A new entry is created with the button "New entry". The keyword, text colour and special flags can then be set in the then opened dialog box. The keywords are processed with falling priority. This means that a defined syntax colour at the top of the list can overwrite those below.
Example:
1. else would appear as: #else 2. #else When listed in the other order, the desired result is achieved:
1. #else would appear as: #else 2. else
The flags have the following meaning:
The background colours are not able to be altered.
| There is still another special feature:
one can also include a line break in a keyword using "\n". On the other hand, a character string, written exactly the same, can no longer be treated literally! |
The keyword is included by pressing "OK".
Changing a keyword is similarly achieved.
Colours and keywords are stored in plain text
in the INI file and can also be edited directly.
![]()
There are four levels of search functions:
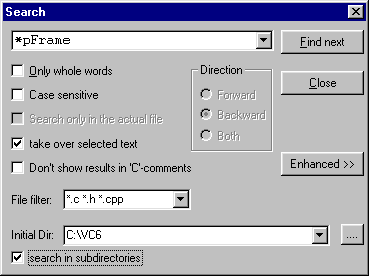
To simplify operation, it is possible to bring a selection in the document directly into the search window, by selecting the check box "take over selected text". This means that, unlike in competitors' products, the otherwise necessary copy-insert is avoided.
Aside from this, the first search function corresponds to the usual functionality, with an additional extension for special characters such as TAB "\t", new line "\n" which can also be searched for in combination with text. Searching for a backslash "\" must therefore be formulated differently.
| Example: | c:\tmp | will search for "c:TABmp" |
| c:\\tmp | will search for "c:\tmp" |
Searching using versions 2, 3 and 4 puts the search results in the output window. The appropriate document is activated or loaded by double clicking on the respective line. Additionally, there is an option not to show results obtained from inside C-comments. This is a language specific setting but is nevertheless quite useful when JFE is intended as a programming editor.
Search version 4 can be accessed by clicking on "Extended" from search version 2. Thus it is possible to search for text in a file which is not currently opened. Naturally it is useful here to limit the number of files which are searched. This is possibly using the specification of a data filter. Additional filters are separated by blanks. Wild cards are possible.
| Examples: | *.c *.h | Searches for all files with the extension "h" and "c" |
| O?t*.* | Looks for all files which begin with
"O" then any character followed by "t",
and then other characters until the dot, and then any other
extension. Finds: Otto.txt, OttoMax.cpp |
The search is executed in the directory entered as the initial directory.
This is the current work path when the dialog is first opened.
Subdirectories are searched if the appropriate option is selected.
![]()
Bookmarks allow a programmer to quickly again find a specific place in a document. This is particularly good if you are scrolling back and forth within a document or switching constantly between several documents. A bookmark is displayed as a key in a toolbar on the (default) right side of the work area. The bookmarks of the currently active window are yellow paper clips with all others black. For each bookmark button the associated Tool Tip shows the filename and line number of the bookmark. Any Tool Tip text can also be assigned to each bookmark. To do this, click with the right mouse button on the bookmark to be altered, and fill in the input field with the required name.
Bookmarks are set through:
They can be deleted the same way, by simply going to the bookmark to be deleted and deleting it using the above commands.
![]()
| OpenWindows Multi Click | Therefore multi clicks are possible
| |
| Hold selection after paste | Normally, after insertion of text the highlighting is removed and the cursor goes to the end of the selected text. When using this setting "Hold selection after Paste" the text remains selected. | |
| Focus not until 2nd click | When changing between documents, the current document is only able to be edited after the second click. | |
| Run as a single instance (file menu) | Normally, for each file that is opened from Explore (using Drag, double click, Send To) a new instance of JFE is started. This can be prevented using this option. Therefore, the file will be opened and become active using the existing application. | |
| Tabs | 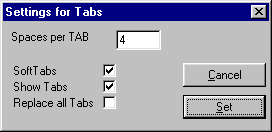 | |
| Tabs can either be inserted as Hard Tabs (character code 0x09) or as a sequence of blanks (Soft Tabs). A transformation from hard tabs to soft tabs is possible, but not vice versa. Hard TABs can be represented as characters (internally a Hard TAB is represented by the characters 0x09 + a variable number of 0x01). Hard tabs can also be displayed. The tab character is a small box, the (virtual) blanks are underlines. | ||
| Backup | Using backups, files can possibly be configured differently. First a copy is created which lasts the entire session, which gets the extension ".org". Backups (extension ".bak") can be created each time the document is saved. To minimize the risk of data loss, a document can also be saved automatically at adjustable intervals. | |
| Auto indent | When a line feed is executed, the cursor is placed beneath the beginning of the previous line. Line feed after an opening curved bracket '{' places the next line an additional tab with in. A closing curved bracket '}' will, where possible, be placed under the column of the appropriate opening bracket. Macros are applied in a lines if they are in several lines. | |
| No search results in C comments |
When searching, strings found within C-comments will not be displayed. This setting is appropriate for looking up in files as well as within brackets. The normal search function is not influenced by it. | |
| Save in UNIX Format | This setting results with saves using LF (0x0A) rather than the DOS CR/LF (0x0D/0x0A). This function can also be executed by clicking on the appropriate symbol in the status border. The format of a file is detected upon opening, and, if not modified, it is saved as the original format. The menu option always shows the format of the currently active file. | |
| Auto copy | Selected text is automatically transferred to the clipboard. | |
| Line wrapping | Using this setting, the column at which line breaks
should occur can be set independently. You can chose the column
number or can use the automatic break.
Sometimes you may want the line breaks only after whole words.
Then you must select "Wrap only between words".
The line break will be done always at word borders.
If the line doesn't contain more than one word,
the line will be still broken at the set limit. ATTENTION, automatic line wrapping slows down the editor dramatically. Use it only if necessary. | |
| Auto Search | Switches Autobrowser on/off | |
| AutoSearch Configuration | Opens the dialog for configuration of the Autobrowser | |
| Default directory | When set, all open/save-operations will offer the same default directory. The entry will be saved in the workspace as also in the INI-file. | |
| Split | When activated you can divide the document in up to 4 independent scrollable views. | |
![]()
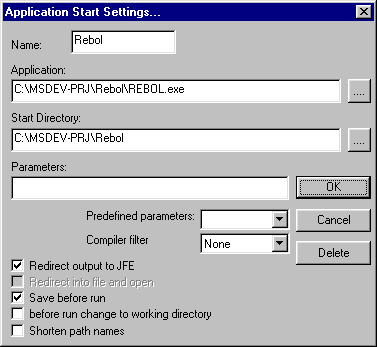
The Tool Menu provides practical functionality used to
assemble, compile or link edited sources.
In addition, JFE also provides the following:
with the menu item "Settings - Add Tool",
the dialog on the right will open (with new tools it is empty).
The different Windows versions and applications can react very differently
on the start of another application and this setting can allow a number
of different adjustments to achieve the desired behaviour.
The output of a DOS application is always affected i.e. the output
of STDOUT and STDERR can be handled in three different ways:
|
 |
|||||||||||||||||||||||||||||
For the start of an application there are
three possible (but not mandatory) parameters:
The parameters can be selected directly from the list, and can be entered at the selection in the edit field. When the file is compiled, error messages (which certainly can be expected) are shown in the output window. It would be very nice if you did not have to read the error, open the appropriate file and scroll through. Again, this problem has been solved in JFE. Simply double click on the error message and the document is looked up and scrolled through until the location of the error. Unfortunately, each compiler produces a different output. Therefore, one should select a suitable format from the set of formats under "Compiler Filters". (If there is not an appropriate filter, I could still create more!) The following filters are currently available:
In the right column an example of the output produced is shown.
Hence you can choose a suitable filter. A tool appears in its own tool bar list as a button. The name displayed there is the description given in the input field "name" (maximum 15 characters). The tools in the tool list can be subsequently sorted using Drag-Drop. The settings dialog can be opened to adjust the settings by clicking on the respective tool button with the right mouse button. If a virus search program is running in the background, the output bypass does not always function correctly. This is evident when suddenly, without motivation, the floppy disk drive is accessed or when make.exe hangs. The only way to avoid this is to switch off the virus search program or to do without the output bypass. Some old tools cannot be redirected, but they always produce a file of specified name. Sometimes it helps to insert the command "TYPE outputfile" into a batch file after the termination of a tool. Thus the output can still take place in the output window. The check boxes have the following meanings:
| ||||||||||||||||||||||||||||||
![]()
It's very uncomfortable if you have always to scroll or switch between different files if you work on large projects to search for variables, defines and functions. If such informations are available inside the project, this work can be done by the program itself. Exactly this does the autobrowser. If it's started it searches all configured files and pathes for these informations. It builds up an internal list with links to the locations in the associated files. If the cursor moves over a keyword contained in this list a tooltip will be shown. Depend of the entry the tooltip contains the following informations:
Tag type Keyword Tooltip content Definition #define Value of the define Enum enum Enum name Type definition struct
unionName of the structure or structure member Function (depend of context) Function prototype Variable (depend of context) Type of the variable extern functions extern Function prototype
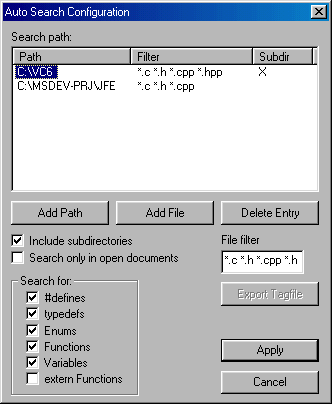 |
The search can be done either in the configured pathes including
the subdirectories or only inside the opened files. It's also possible
to select single files. For each path you can set a file filter to
include only interesting files. Multiple types will be separated by spaces. In the field "Search for:" you can select for which C-constructs you want to search with the browser. The internal browser data base can be written as ASCII-text file with the option "Export Tagfile". The browser can be started with the button "B" in the status bar or using the menu entry "Auto search". The browser stops normally by itself if it has finished searching all files. But it can be stopped also by click on the rotating arrow in the status bar. Not later than 5s the browser thread should be finished. The browser thread runs in the background with low priority. So it doesn't affect the normal working. If you save or close a file while the browser is running it will be terminated to avoid inconsistencies in the data base. |
![]()
|
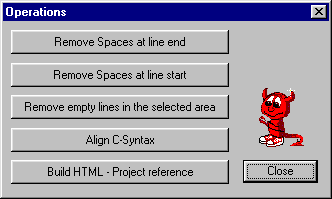 |
The operations carried out through this dialog cannot be reversed. Therefore SAVE beforehand!
![]()
The structure of C is naturally a matter of personal taste. Therefore each form of automatic alignment is also open to criticism. Hence: The C syntax alignment implements my personal conception of how C/C++ should be structured for readability. Those who do not like the given alignment do not have to use it, but there also remains sufficient degrees of freedom. Here are the rules for the C syntax alignment:
![]()
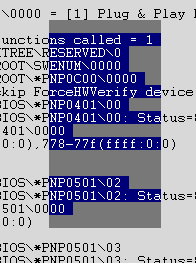
What programmer does not know the problem: you get heaps of source and header files (or you have written heaps) and now everything must be documented simply to understand the overall purpose of the files. And when you begin to search for a particular link, it can develop into a muddled heap. Usually is the first accessed thread unfortunately the wrong thread, and you need infinite time to find the sense inside the chaos.
Therefore it would be good, if you had a tool which would decrease the work to clear up who, whom, from where and how often a function is called. All comments, which begin with the character '*', are also transferred to the HTML reference file as function descriptions. And this operation does exactly that. And thus it would be particularly good, if the function calls could be supplied with links. Therefore one can comprehend the calls by link. In addition, you can use the created HTML file very well as a basis for software documentation. (HTML can be also imported into Word.)
So far so good. However there are limitations past which machine logic cannot create documentation. Indirect calls using pointers cannot be resolved. Similarly, it is not possible to document information flows around messages. In these cases, one must still search through the code.
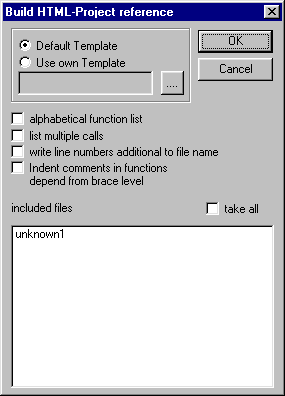 |
Template: Alphabetical function list: Repeated calls list: Display Line numbers in the HTML file: Indenting comments in functions after parentheses levels: |
![]()
This Example
almost corresponds to the default template.
It is important that a horizontal ruler <HR>
is inserted after the headline.
Tables cannot be used.
The following variables can be replaced:
| $f | the function name |
| $s | the name of the source file |
| $h | the name of the header file in which the function is declared |
| $r | functions which call this function. When the calling function is found, a link is inserted here. |
| $c | functions which are called through this function. When the called function is found, a link is inserted here. |
| $p | the function prototype of the function |
| $dx | Comments that should be transferred to the HTML file: "x" stands for a character after which the comment should begin (no blank spaces). There it is possible to separate different information from the comments in the HTML description. Example: $d# transfers all comments that begin with # /*# these comments would be transferred and also this row until */ //#also is transferred into the HTML file |
Once the file is created, it naturally can be further edited (for example by inserting program structure charts and verbal descriptions). However, these modifications are overwritten again upon a new creation.
In the header of the created HTML file (and also before the first function description), the information extracted from the comments in each file is collected. For example, this could be the version number etc. Since there is no necessary or usual way of writing this information, I have attempted to arrange it as universally as possible.
What to do:
It is assumed that one has a file heading such as that below in each file:
/******************************************************************************/
// CLASS: < ISDNPORT >
// CLASS ID:
/******************************************************************************/
// FILE NAME: isdnPort.h
// VERSION: 3.2.00
// FUNCTION: main function for anything
// REMARKS:
//----------------------------------------------------------------------------*/
// Copyright © 1999 */
/*----------------------------------------------------------------------------*/
// AUTHOR/S: Jens Altmann (TCD) */
//----------------------------------------------------------------------------*/
// CREATION DATE: 02.11.99
//----+------+---------------------------------------------+------------------*/
// VER| DATE | CHANGES | AUTHOR */
//----+------+---------------------------------------------+------------------*/
//
/******************************************************************************/
Here you can transfer the Author, Version,
and Creation Date information from the
heading of each file to be included to the created HTML file.
One would also search in the source file for the type of information
to be transferred.
Thus:
| Author | AUTHOR/S: | |
| Version | VERSION: | |
| Creation Date | DATE: |
This flag may contain no separators
(blank spaces, tabs, line feeds)!
For the file name and work area there are pre-defined flags:
| File | $f | |
| Work area | $prj |
In addition, it is of utmost importance that the area which
contains this information is marked at the beginning and end by
the comments <!--prjinfo-->.
This piece of HTML code is then copied for each file and filled with
the appropriate information. The flags which are filled in through
the source files begin with a $.
Thus:
$VERSION:
$AUTHOR/S:
$DATE:
One saves and creates the HTML file. JFE first looks for the comment area. When this exists, all words marked with $ are searched for. When such a word is found, all files are searched through for this word (without $). When the word is found in a file inside a comment, the text immediately following (up to the end of the line) is entered into the template in place of the flag.
This sounds very confusing. For clarification, it is best to look at the example template and its source code.
![]()
Work areas are a convenient mechanism when you work with multiple files and do not want to individually open each file upon start-up. In a work area, the following important settings are saved:
JFE also stores a list of the last opened files in the work area.
A work area is automatically saved on exit.
At this point in time, all opened files are transferred into the work area and they are restored when the work area is next opened. The name of a work area (Project) can be accessed in a macro using the variable $PRJ. One can also create a link in Explorer, so that projects can be directly opened by double clicking in Explorer.
![]()
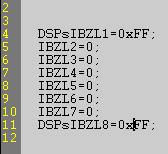
| 1. | The text appears like this, and one wants to insert the string "xFF" before the semicolon | 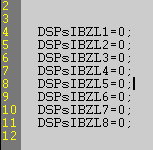 |
 |
| 2. | Select the desired area | 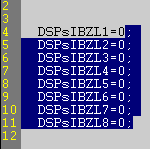 |
 |
| 3. | Chose "Fill selected column" from the Context menu and enter "xFF" into the dialog box | 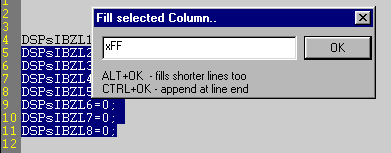 |
 |
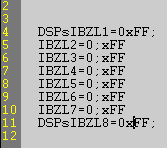
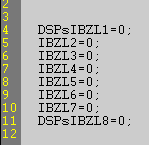
| 4. | select OK: with/without the ALT-key pressed, it gives the following results | 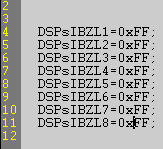 |
without ALT-key
|
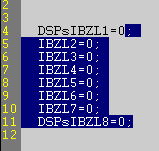
| with ALT-key
|
| 1. | Select the area to be shifted The start of the selected area must be at the first character to be shifted. |
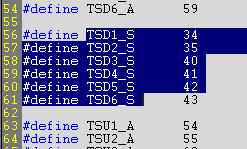 |
| 2. | Click on the right mouse button and chose
"Insert Move Text". A read line will be drawn in front of the column to be indented. The Cursor symbol will be altered (can be aborted using ESCAPE). |
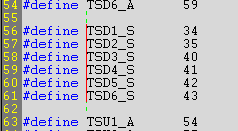 |
| 3. | Move the red line left or right using the mouse (press the left button) to the desired position. Then release the left mouse button. The text now is positioned in the new column, still selected. | 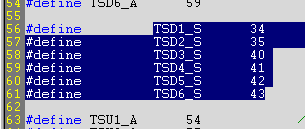 |
![]()
Macros can make life easier!
JFE implements two possibilities to define and use macros.
Macros can be inserted as text macros or
keyboard macros which record key strokes.
JFE allows a programmer to load up to 20
macros from an external file.
This file must be called "macro.txt"
and exist in the same directory as "jfe.exe".
Macros are accessible through the context menu.
A macro can be any piece of text and also contain replaceable variables.
The format required to define a macro is as follows (for example):
$macro Switch switch( ) { case: break; case: break; default: break; } $endmacro
A macro always begins with the statement
$macro and ends with
$endmacro.
Therefore macros can be separated within a file.
In between these two statements is the macro text.
The word following $macro (in the same line) is the name of the macro which
will be displayed in the context menu.
Here are the predefined variables which can be filled in when a macro is run:
$dd The current date in german format dd.mm.yy $de The current date in american format mm/dd/yy $FILE The file name (without path) of the current document $USER The user name logged into Windows $PATH The complete pathname of the current document $wd The abbreviated day of the week in German $we The abbreviated day of the week in English $PRJ The name of the work area (project)
When no work area is present, this variable is not replaced.$t The current time in format hh:mm
These variable names can be used in text macros, and at the time of insertion will be replaced by their values.
A speciality of JFE is updatable macros. What are these then?
Normally, variables are replaced when the macro is run and thereafter the
text is set. However, it is sometimes desirable that a macro is updated
when saving a file. For example, it may be desirable to document the last
alteration to a file. A macro, once run, cannot detect such an effect.
Therefore, one must create this feature artificially. For example:
$macro $LAST MODIFICATION
: $dd /$t $USER
$endmacro
The macro name begins with a '$'. When saving, all macro names which begin with $
are searched through and the text is extended with the replacement macro text.
In this example, the string "LAST MODIFICATION"
would be replaced with (for example)
LAST MODIFICATION: 05.05.99 /20:23 altj.
This would occur on each save.
The behaviour of variables when expanding differs. The variables which have unforeseeable lengths when expanding will overwrite the following blanks (only the blanks!). The variables which have a fixed length (time, date ...) are replaced and the text which follows is moved to the rear.
Before keyboard macros can be used, they first have to be recorded.
To perform this, one has to start the macro recorder in the menu
"Edit - record macro".
The operation is very comprehensive.
After a click on the red recording button all key strokes and selected
commands are recorded. After recording has been terminated (button with dark
rectangle), the macro can be saved as a file with extension ".mcr".
(This file is binary and cannot be read as plain ASCII text.)
Simultaneously the user has the option to include the macro as a new tool
into the toolbar. After that it can be used as a tool. A click on the
corresponding button starts the macro, that means all recorded keys and
commands are inserted or executed at the
current cursor position !!
Hence one should think very carefully about the intended effect.
Aside of key strokes the following commands are recorded:
Cut Copy Copy++ Paste Delete line Search (including search text and search flags) Goto brace Select brace range Convert to upper Convert to lower Capitalize Send to port Receive from port
![]()
I hardly ever use Hotkeys myself, but occasionally one is required.
Since everyone prefers differing key assignments, it is now possible to
set the key assignment yourself (Menu - Settings - Keyboard Mapping).
The following Hotkeys are predefined:
CTRL-C
CTRL-InsertCopy CTRL-X
CTRL-DeleteCut CTRL-V
SHIFT-InsertPaste CTRL-Z Undo CTRL-I Indent the selected area one column to the right CTRL-U Indent the selected area one column to the left CTRL-B Indent the selected block one column to the right CTRL-M Indent the selected block one column to the left CTRL-F open the search dialog CTRL-R open the search/replace dialog F3 continue searching CTRL-G go to the line CTRL-Y delete line CTRL-F9 invoke tool F12 set/delete bookmark CTRL-P CTRL-N new document CTRL-S save CTRL-O open F11 save and terminate without confirmation CTRL+F11 terminate without saving and confirmation F6 next document
![]()
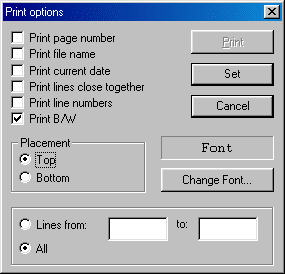
JFE has naturally also developed printing functionalities. In comparison to other editors, coloured printout can also be produced, with the pre requisite that syntax highlighting is switched on. The layout of the page can also be controlled. The selected font is also used for the printout.
| A special settings dialog box is used
to set individual desires related to printing. Every page can contain a banner. This banner can be at the top of or at the bottom of the page. The banner can contain:
|
 |
![]()
The toolbar for recording macros
contains two additional buttons to send and receive text
via TCP ports. This allows to attach external filters with macros.
The button "Send to port" sends the content of the clipboard
to the selected server port.
The button "Receive from port" clears the clipboard,
waits for data from the selected port,
and copies them into the clipboard.
![]()
![]()
| The author: Jens Altmann Dresden, Germany |
 |
Translators: Lara and A. Oppenheim School of IT, Swinburne University, Australia | |
| Jens.Altmann@t-online.de | |||
| Copyright © 2000-2010 by Jens Altmann |
|||
Last revised: W.W. Heinz, April 30, 2022